Installing DBGate
Table of Contents
- Platform Details
- Installing DBGate on Windows Using Setup Wizard
- Installing DBGate on Windows
- Installing DBGate on Linux
Platform Details
DBGate is an ASP.NET Core application that runs on the cross-platform Kestrel web server for ASP.NET Core.
You can use Kestrel on its own or alongside a reverse proxy server like Internet Information Services (IIS), Nginx, or Apache.
Here are some useful links for installing and tuning ASP.NET Core applications in various scenarios:
- Host ASP.NET Core on Windows with IIS
- Host ASP.NET Core on Linux with Nginx
- Host ASP.NET Core on Linux with Apache
- Kestrel web server implementation in ASP.NET Core
Installing DBGate on Windows Using Setup Wizard
The DBGate setup wizard simplifies the installation and uninstallation of applications and the configuration of SSL certificates.
It supports the following application configurations:
- IIS website
- IIS application
- Windows service
- Console application for .NET
- Console application for .NET Framework
To start the wizard, run dbgate\setup.exe and follow the prompts.
If you installed DBGate using the Windows installer package, you can access the DBGate Setup link from the Windows Start menu.
For optimal use, configure the IIS website to utilize the following links for data editing:
- https://dbgate/edit/mssql/
- https://dbgate/edit/mysql/
- https://dbgate/edit/pgsql/
If you want to try DBGate quickly, launch the console application and use the following HTTPS links:
- https://localhost:5003/edit/mssql/
- https://localhost:5003/edit/mysql/
- https://localhost:5003/edit/pgsql/
Alternatively, you can use HTTP links if the SSL certificate isn't configured:
- http://localhost:5003/edit/mssql/
- http://localhost:5003/edit/mysql/
- http://localhost:5003/edit/pgsql/
The setup.exe offers several modes to automate operations. Run setup /? for help.
The wizard supports multiple languages, defaulting to the Windows UI language. You can specify a language using the following switches: /cn, /de, /en, /es, /fr, /hans, /hant, /it, /ja, /ko, /pt, /ru, /tw.
Installing DBGate on Windows
- Enable IIS on your machine.
- Install the .NET Core Hosting Bundle.
- Restart IIS.
- Copy the
dbgatesubfolder from the DBGate download package to your local drive, e.g.,C:\inetpub. - Add connection strings for your databases to the appsettings file.
- Create a DBGate application pool.
- Create a DBGate website or application.
Below are details for steps 6-7.
Creating DBGate Application Pool
Open IIS Manager, select Application Pools, and click Add Application Pool... to create a new application pool.
Use the following values:
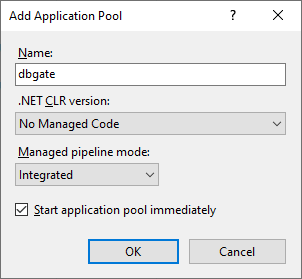
- Name:
dbgate - .NET CLR version:
No Managed Code - Managed pipeline mode:
Integrated
Creating DBGate Website
Use this scenario to create a subdomain like dbgate.contoso.com or a local domain like dbgate to access it via https://dbgate/.
If using a local domain, add the following line to the c:\windows\system32\drivers\etc\hosts file:
127.0.0.1 dbgate
To create a website, select the Sites node and click Add Website....
Use the following values:
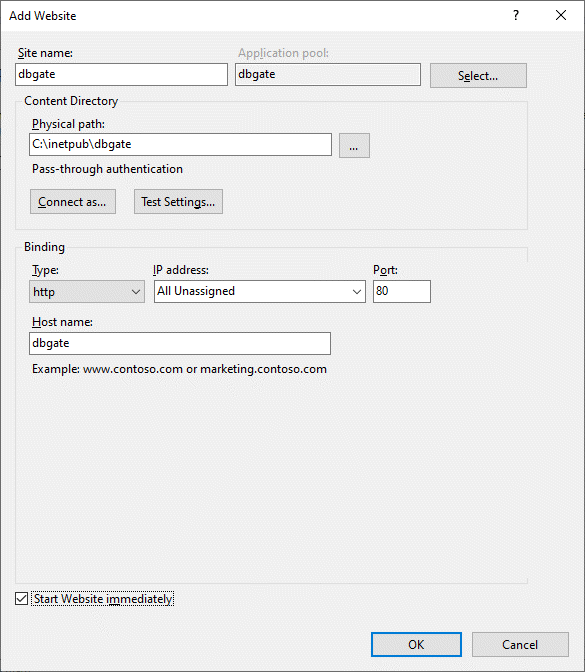
Make sure to select the dbgate application pool created earlier.
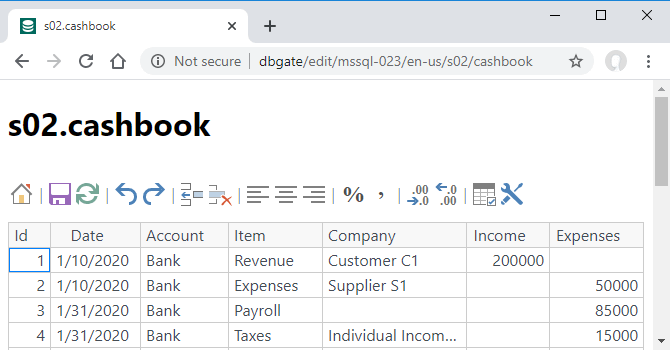
To test the local website installation, open the URL:
http://dbgate/
You should see the index page. Try out the samples.
For instance, access the cashbook table of the mssql-023 sample hosted in an online SQL Server database:
Configuring HTTPS Certificate on Windows
Avoid using DBGate over HTTP, as browsers transmit logins and passwords in plain text.
Always enable HTTPS and redirect HTTP to HTTPS.
To create a self-signed certificate, follow these steps:
- Open Windows PowerShell (Admin) and run the following command:
New-SelfSignedCertificate -NotBefore (Get-Date) -NotAfter (Get-Date).AddYears(5) -DnsName "localhost", "dbgate" -KeyAlgorithm "RSA" -KeyLength 2048 -HashAlgorithm "SHA256" -CertStoreLocation "Cert:\LocalMachine\My" -KeyUsage KeyEncipherment -FriendlyName "DBGate Certificate" -TextExtension @("2.5.29.19={critical}{text}","2.5.29.37={critical}{text}1.3.6.1.5.5.7.3.1")
This command creates a self-signed certificate for the localhost and dbgate hosts.
For more details, see New-SelfSignedCertificate.
Open
certlm.mscand copy the DBGate Certificate from thePersonal Certificatesstore toTrusted Root Certification Authorities.Open
IIS Manager, selectDefault Web Site, and access its bindings. SelectHTTPS, clickEdit..., and choose the DBGate Certificate from theSSL Certificatelist. ClickOK.
To revert changes, restore the initial SSL certificate and delete the DBGate Certificate using certlm.msc.
Creating DBGate Application
Use this scenario to create an application like www.contoso.com/dbgate/ or localhost/dbgate/.
To create an application, select the desired website node, right-click, and click Add Application....
Use the following values:
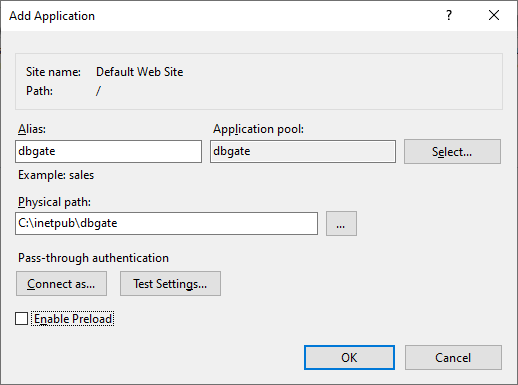
Ensure you select the dbgate application pool created earlier.
To test the localhost application, open the URL:
http://localhost/dbgate/
You should see the index page. Experiment with the samples.
For example, access the s02_cashbook table of the mssql-023 sample hosted in an online SQL Server database:
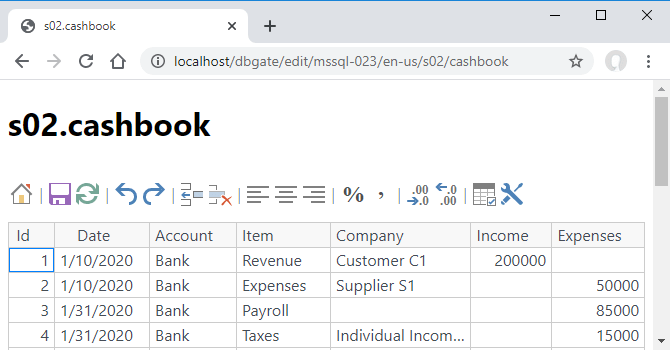
Note that DBGate automatically replaces the <base href="/"> line with <base href="/dbgate/"> for IIS applications.
Installing DBGate on Linux
For complete guides, refer to:
In summary, follow these steps:
- Install the ASP.NET Core Runtime 8.0.
- Copy the
dbgatesubfolder from the DBGate download package to the/var/wwwfolder. - Add connection strings for your databases to the appsettings file.
- Check or change the default Kestrel DBGate port (5003) in the appsettings file.
- Create a service file to manage the Kestrel process and enable the service.
- Create a DBGate subdomain.
- Configure an HTTPS certificate.
Below are details for steps 5-7.
Creating a service file to manage the Kestrel process and enabling the service
Refer to this guide for more details: Create the service file.
We recommend creating the /etc/systemd/system/kestrel-dbgate.service file with the following content:
[Unit]
Description=dbgate

[Service]
WorkingDirectory=/var/www/dbgate
ExecStart=/usr/bin/dotnet /var/www/dbgate/dbgate.dll
Restart=on-failure
Restart=always
# Restart service after 10 seconds if the dotnet service crashes:
RestartSec=10
KillSignal=SIGINT
SyslogIdentifier=dotnet-dbgate
User=www-data
Environment=ASPNETCORE_ENVIRONMENT=Production
Environment=DOTNET_PRINT_TELEMETRY_MESSAGE=false

[Install]
WantedBy=multi-user.target
After creating the file, enable and start the service:
sudo systemctl enable kestrel-dbgate.service
sudo systemctl start kestrel-dbgate.service
sudo systemctl status kestrel-dbgate.service
To test the service, use a command like:
curl http://localhost:5003/api/mssql-023/cashbook
Creating a DBGate subdomain
To create a subdomain, follow these steps:
- Create the DNS A record for your domain.
- Add a subdomain section to your domain configuration file.
Here’s an example Nginx configuration for the dbgate.savetodb.com subdomain:
server {

    server_name dbgate.savetodb.com;

    location / {
        proxy_pass         http://localhost:5003;
        proxy_http_version 1.1;
        proxy_set_header   Upgrade $http_upgrade;
        proxy_set_header   Connection keep-alive;
        proxy_set_header   Host $host;
        proxy_cache_bypass $http_upgrade;
        proxy_set_header   X-Forwarded-For $proxy_add_x_forwarded_for;
        proxy_set_header   X-Forwarded-Proto $scheme;
    }
}
Configuring an HTTPS certificate on Linux
We recommend reading this resource: Secure HTTP Traffic with Certbot.